


There are particular blogs I read daily. Some people read the daily paper with their coffee, I chose to read the ramblings of Stephanie & Katie... they are my bff's and don’t even know it! So when they announced their new LinkUp
“Saw it. Pinned it. Did it.”
I jumped at the opportunity to post my first of many DIY projects.

I racked my brain as to what to do for my new hubby for our 1 year anniversary. We were already spending money on our trip so I didn’t want to spend a ton, plus, I’m a lover of DIY and I will use any excuse to make something myself. I perused pinterest and esty… NOTHING. I was going crazy.
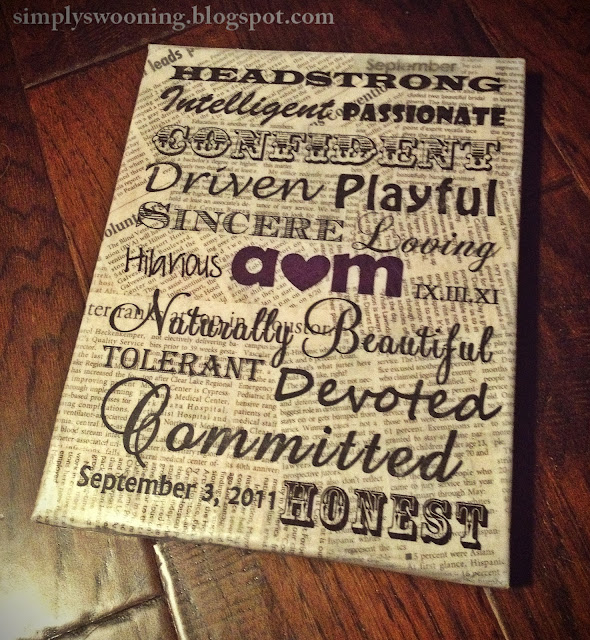
So for this project I took the paper anniversary quite literally and used……… PAPER! That was a thinker.

For our wedding, Pastor Larry asked Michael & I to come up with words describing one another and he would incorporate them during our ceremony.
Let’s just say, we know each other well and
I don’t think either one of us were surprised by the chosen words.
I hope that this plaque sits in my home forever, whether it be on a bookshelf or hanging on the wall. Hell, maybe my kids will love it and want it one day to remember their Ma & Pa. God I hope they never call us that! Sure most people when looking at it at first glance wont know what the words stand for or even the roman numerals, but I kinda think that’s what makes it special.
So, let’s get to it… how to make a simple diy paper anniversary plaque.
My dad saved a newspaper from the day that Michael and I tied the knot, but you can use any background. I even thought of using a map of the location since our wedding was semi-destination.
What you will need:

1. 8x10 canvas, mine is from Hobby Lobby. I made it small so that it can subtly sit anywhere in my room as decor.
2. Jar of Mod Podge, also from Hobby Lobby. (ALWAYS use a 40% coupon!)
3. Foam brush, found anywhere! I feel that the foam brush allows the mod podge to coat evenly.
4. Newspaper, map, etc. for the background.
Clear an area where the canvas can sit overnight. I propped the canvas over a paint can, so I could completely wrap the newspaper over the sides of the canvas to the back for complete coverage.

First lightly cover the canvas with a layer of mod podge (it has a glue consistency) so the newspaper has something to adhere to.

Lay the strips of newspaper in various angles and all different directions so that it looks random.. you really can’t mess this part up. Along the way smooth out any bumps so the newspaper is flat on the canvas.
When the canvas is completely covered by the newspaper, again give it an all over coat of the mod podge and let it dry over night.
Finally, you can use any print program that you want, I used power point simply because it is already set to an 8x11 frame and allows me to move the words in different text boxes to the location of my liking. Choose your words, your favorite quote, a picture of the two of you, etc. and arrange to your liking.

Here is where you will use your 3M CLEAR full sheet labels. You will need an inkjet printer. Use these labels as you would a sheet of paper, place it in your printer and print! It may need to dry a few minutes to avoid smudging. Next peel off the backing and align the label with your newspaper covered canvas and STICK! Viola! Trim any edges or fold them over the sides of the canvas, you wont see much of a seam.
Last, take your mod podge once again and give it a good final coat. Don’t worry, it comes out clear! I'm loving how it turned out & the hubby really appreciated how much thought I put into it.
Dream Job #25: Professional Pinterest Pinner

This is SO sweet!! And it turned out beautiful, way to go girlie!
ReplyDeleteThis turned out so well! I love the pictures of the "ingredients" and your notes on the steps. My friend wants to do something for her boyfriend for an anniversary so I'm going to show her this!
ReplyDeleteAdorable girl! and I'm dying at your first sentence..haha you are so sweet!! thanks so much. You did great this project is such a good idea. Go you.
ReplyDeleteOh this is great! Too cute.
ReplyDeleteThis is awesome!!
ReplyDeleteHoly crap! This is AMAZING!!! WHY didn't I think of this?! Poor Beau...he got a bible lol. You are so sweet-I smiled when I read the comment about Katie and I! Seriously-I love that girl...you would too!
ReplyDeleteCan we talk about the fact that I'm now reading YOUR blog??!! Seriously?! I'm so excited you started this!! xoxo
Oh-and of course...thanks so much for linking up to us!
This is such a cute idea!!! Looks so good!!
ReplyDeleteDon't be surprised if you see something quite similar in my house in about a year!
ReplyDelete