


I have been looking forward to
this day ALL week, not only because today is my Friday (whoop!)
but because it’s time for another round of…
but because it’s time for another round of…
Saw It. Pinned it. Did it.
Did anyone else say that in the
game show host voice or was that just me?!
Let's thank little miss stephanie & katie for hosting this today, shall we?
Let's thank little miss stephanie & katie for hosting this today, shall we?

I LIVE for DIY, LOVE IT!!! So
when my cousin Michelle asked me to help her make a streamer backdrop for her
wedding, of course I said yes!
Who doesn’t like to play around
in brightly colored paper with hot glue?
The church had some.. let's just say "boring" brick walls for photo ops...
We spiced it up a little!
The church had some.. let's just say "boring" brick walls for photo ops...
We spiced it up a little!
Insert:
the pic that won us over! ahhhhhh (angels!)

What you will need:
Glue gun / sticks (we almost
forgot those)
Dowel rods
Scissors

Dowel Rods: We used (3) 3'x1" dowels purchased from Hobby Lobby.
Crepe Paper FOLDED: THIS IS IMPORTANT! Determine the colors you wish to use, we used 12 packs of FOLDED paper because we wanted it to look very full.
*Do NOT buy the little rolls you see in party city, its not the same.

We started by dividing the crepe paper into (5) ~3 inch sections,
where we then made ~1/2" cuts on either side (leave a 1" median- didnt know what else to call it) to create the fridge look.

When you begin to unroll the crepe paper, it will look like this...

Once we finished cutting all of our paper, the hot gluing began..
We left each rod separate, simply to keep this big guy reasonably mobile.
I started by gluing the gold fringe to the rods in sections, since we obviously didn't buy enough to cover 9' (save that $$$ honey!)

**When gluing... place the hot glue directly on the crepe paper, its thick enough not to burn you and allows for better placement..
Next, JUST START GLUING!
I used one color family at a time to make sure there was adequate spacing...

It was super colorful by the end, which we LOVED!

There was a team of 3 working on this project (4 if you count Dakota “helping from the ottoman”) and it took us about 2 hours.

Once we finished cutting all of our paper, the hot gluing began..
We left each rod separate, simply to keep this big guy reasonably mobile.
I started by gluing the gold fringe to the rods in sections, since we obviously didn't buy enough to cover 9' (save that $$$ honey!)
**When gluing... place the hot glue directly on the crepe paper, its thick enough not to burn you and allows for better placement..
Next, JUST START GLUING!
I used one color family at a time to make sure there was adequate spacing...

It was super colorful by the end, which we LOVED!

There was a team of 3 working on this project (4 if you count Dakota “helping from the ottoman”) and it took us about 2 hours.
So, turn on the DVR (in our
case, Scandal, love me some Kerri Washington) and get to cuttin’!

**For transportation: we laid all 3 rods on a sheet and loosely rolled it... it worked pretty well. Command hooks were used for hanging.

**For transportation: we laid all 3 rods on a sheet and loosely rolled it... it worked pretty well. Command hooks were used for hanging.
Oh, you want to see the
professional pics? I’m glad you asked…


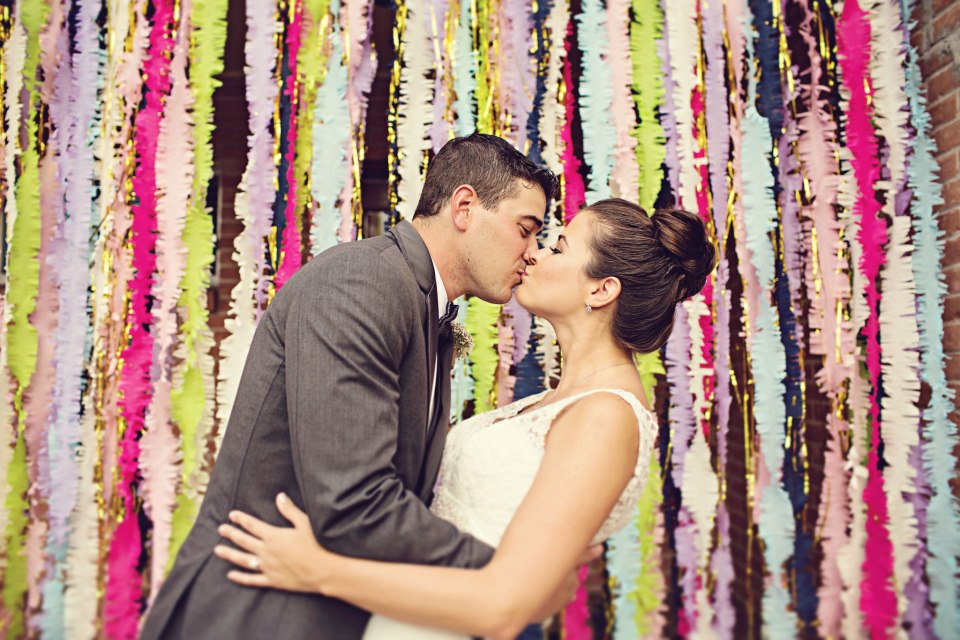
We actually used the backdrop in two locations… the wedding party took individual shots at the church and then we moved the little booger on over to the venue where lots of people took advantage of the fun backdrop! Live in COLOR!!!


Oh my goodness, this is SO cute! You did an amazing job! I love how well the colors go with your (adorable) bridesmaid dresses! And that bride is too cute!
ReplyDeleteOf the 27 bridesmaids dresses I own (jk, but there have been a lot). This was by far my fav! And projects are always more fun with groups of people helping ;)
DeleteWhat a great idea! It turned out so pretty with a nice pop of color in all the photos!
ReplyDeleteWe were pretty pleased with how it turned out and by how much use we got out of it... Thanks for following me!
DeleteUm, I'm just going to go ahead and take offense to the fact that Dakota was "sort of" counted as someone who was helping out- while i was there laying on the couch just like she was! I COUNT TOO!
ReplyDeleteApril...SHUT UP! This is GORGEOUS! Like, I'm legit IN LOVE!!! GO YOU!
ReplyDeletePS-so sorry I'm just now commenting! Life has been CRAY these past few days. Thank you for linking up with Katie & I!
This is amazing and I am stealing it for a bridal shower! Thanksfor the easy step by step instructions!
ReplyDelete